Saturday, February 8, 2014

Switching Things Up: how to replace a kill switch on your P series

So several weeks ago my kill switch broke - very unfortunate. It broke in the "off" position - meaning that the scooter couldn't be started!

My temporary solution (and it took me longer to get around to fixing than it should have...) was to unplug the green kill wire from the CDI at the back of the engine. This allowed me to run the scooter... but of course when the green wire is unplugged, then you can't turn the scooter off! So, for the last couple of weeks I've been turning the scooter off by popping the cowl off the engine side and reconnecting the green kill switch wire to the CDI. Engine dies, then I pull the wire back off and the scooter is ready to be started again.

But this was ridiculous - imagine having to pop the hood of your car in every parking lot you stop in to turn the engine off! I get enough looks as it is on a 34 year old Vespa scooter.

So I ordered a new kill switch, and today I finally got around to replacing it. I took some pictures and thought I would share how it is done for those who are curious - chances are you'll need to do it at some point because if the switch doesn't physically break like mine did, the wiring will probably crumble and short out eventually on these old machines, prompting a similar problem.

From a conceptual standpoint, replacing the kill switch is super easy - all you need is a Phillips screwdriver, some sturdy twine, and a new kill switch. But if you don't have the twine, it will be very difficult and annoying, as I will explain in a minute.

Step 1:
Remove the horncast - this is very easy: take the tiny screw out of the black plastic Piaggio emblem at the top of the horncast, remove the emblem. This exposes two larger screws that hold the top of the horncast against the frame. Remove these, and remove their counterparts hiding inside the glovebox that hold the bottom of the horncast against the frame. Then unplug the two wires from the horn and you can lift the horncast off and set it aside. This exposes this junction box:

The junction box connects the left and right handlebar switches to the rest of the wiring loom.

Step 2:
Remove the upper headset by unscrewing the two screws on the underside of each handlebar:
Then to lift the headset up, you create slack in the speedo cable by pushing the excess cable up into the fork (you don't need to disconnect it from the hub - there is enough slack to get the headset up far enough to work on). Simply grab the cable as shown here and gently push it toward the fork arm:
Up at the headset, this slack will allow you to lift the upper headset up enough to reach your hand in and unscrew the ring nut holding the speedo cable against the speedometer. I've wrapped a little duct tape around the top of the cable just below the ring nut to prevent the nut from sliding down the cable and getting lodge inside the fork (what a pain when that happens!)... a rubber band or somesuch would work as well.

Once the speedo cable is free from the speedometer, you can lift the headset away and let it dangle from the wires - try to be gentle so as not to break anything, and try not to disconnect the wires from the top of the headset, otherwise you'll need to reference a wiring diagram to figure out what goes where.

At this point you can peek around the front of the scooter while tugging on the wiring running from the kill switch and you'll be able to see which pair of wires going into the junction box is the one you need to disconnect (hint, it's the green, blue, brown, white, and black set of wires):

Step 3:
Go ahead and unplug the kill switch wires from the wiring loom in the junction box. But do NOT start pulling the wires up and out of the frame! Think about it: when you put the new kill switch in place, you are going to have to feed its wires down through the frame back to this location. And pushing wires through tight spaces does not work well at all. This is where the twine comes in.
Tie the twine tightly around the wires of the kill switch so that the knot is small and too tight to slip off the end:
Now, when you pull the wiring up through the frame, the twine will follow. Make sure the twine is long enough that it hangs out of the frame where the wiring is supposed to stick out - you should have twine sticking out of the scooter at both the headset and lower frame ends. This will serve as a guide line that you can tug on to pull the wiring of the new kill switch down through the narrow crevasses of the frame and out to the junction box. Again, without a guide line like this, you'll never get the new kill switch's wires down into place.

Go ahead and pull the kill switch wiring up through the frame, tugging gently to make sure the twine doesn't come loose from the wiring.

***Here is a picture of the old kill switch. You can see that the switch is in the "on" position, but the spring covered arm is not in contact with the brass contact point in the top left. Basically, the switch is stuck in "off" regardless of how to flip it. This is a fairly common way for these old switches to fail.


Step 4:

Untie the twine up at the headset from the wiring of the old kill switch. Now you should have twine sticking out of the scooter at both the headset and lower frame ends. Throw the old kill switch away.

Step 5:
Mount the new kill switch on the headset, and tie the twine extra snugly on the wires of the new kill switch. I like to wrap a little duct tape around the end of the wiring and the knot here. This keeps the different wires from splaying wide and jamming up the travel back down through the frame. It will also help prevent the twine from pulling loose from the wires halfway down:
duct tape covered end of the kill switch wiring, ready to be pulled down through the frame

Step 6:
Reach your right hand down and begin to pull on the twine out the front of the frame while feeding the wiring down through the headset with your left hand. Try to both pull and push at these respective ends so that the load isn't all on the knot of the twine (again, we don't want it to come loose halfway down).

If it seems like it is really jamming up, especially where the headset meets the frame and things get really cramped with the throttle cable and other wiring, try rotating the headset a bit so that you can see the most room open for the wiring to enter the frame.

Chances are it will hitch up a few times - be patient and firm with your tugging and it will get through eventually. Just below the headset is a large circular opening in the frame - you might have luck slipping the fingers of your left hand in there and manipulating the wiring while pulling on the twine below if you are in a jam.

Once the wiring has popped out down by the junction, take the duct tape and twine off, plug it in, put everything back together, and enjoy your shiny new functioning kill switch circuity!


Thursday, November 7, 2013

Let the long silence end, part 1: A big move

My life has been chaos for a while - hence the radio silence. In the coming weeks I'll be playing catch-up, posting about things that have already transpired, as well as my most recent maintenance adventures.

The biggest news, and the focus of this post, is that my wife and I moved in June across the country - all the way from Boston to Redwood City in the San Francisco Bay area of California!

This move came about because of a new job at Stanford University, and the change of pace has been interesting and refreshing, though we both do miss Boston and the East coast a lot.

I would say the most exciting part of this move pertaining to scootering is the fact that I can now ride essentially 24/7 12 months of the year. As "winter" approaches, a "rainy season" is setting in here (supposedly), but given that the night-time temperatures rarely reach the winter day-time temps in Boston, I can pretty much enjoy continuous riding.

This change in scenery means I can update my riding map as well
Kinda split the country...


I think uneven tire wear will become my biggest issue with California riding - since moving, I've noticed considerable squaring off of my rear tire from all the prolonged curve-free riding.

Sunday, August 19, 2012

Dr Pulley Sliders

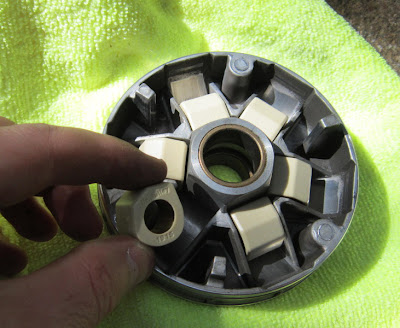
This morning I installed some Dr Pulley Sliders in my variator. These are alternatives to rollers - their unique shape helps both low end acceleration and helps push the variator into higher gearing as well. Plus, by all reports they are virtually indestructible and wear out after a much longer period than rollers.

Like rollers, they must be installed in a specific orientation. Here is a picture of the sliders in my variator showing the correct positioning:

I used 5.5 gram sliders - the recommendation from the manufacturer is to use sliders roughly 10% lighter than the rollers you are using. Now, stock on my late-model ET2 is 6.6 gram, however I have been using 5.7 gram rollers which came with my SP3 upgrade. Not wanting to push my machine into a total rev monster, I decided to stay roughly at the weight class of the SP3 rollers. Note: if you are wanting to add Dr Sliders to your stock ET2, you probably shouldn't go this light... maybe 6 gram sliders based on the manufacturer suggestion.

I've only taken it for a quick spin down the road, but I am very excited at this point: acceleration was much more even and smooth, and my top speed increased by several miles per hour. How all this plays into fuel economy remains to be seen, but very happy at this moment!

Current set-up as of this post: DR Evo 70cc kit (still a bit low on compression following the soft-seize and hone), Leo Vince SP3 exhaust, Dell'orto PHVA 17.5mm carb with a 78 main jet and A7 needle. The rest is stock except for the sliders!

Friday, June 29, 2012

Let there be light!

A recent bummer was that the original sealed-beam headlight on my P200E died. I decided to go for a PX headlight with replaceable halogen H4 bulb, and I'm very glad that I did! I ordered mine from Motorsport Scooters in San Diego - genuine part for the Vespa PX (except the 2005 model), shipped with the correct bulb

The real beauty is that this upgrade essentially is a direct swap.
What you get: a headlight with a main bulb input, some sort of parking bulb input, and wiring appropriate for the PX.
What you will use: the headlight's main bulb input. Toss the PX wiring and ignore the parking bulb input, unless you want to get all fancy and change the functionality of the scooter.

The PX headlight simply screws in place of the original:
 The screw for locking the vertical "aim" of the headlight uses a different hole on the PX headlight. While it used to go through the hole marked with a red X, now it goes through the more forward hole marked with a green circle:
The nice thing I found was that I could use the same screw from the original bulb... just set the nut aside, borrow some of the old washers for the other hole, and screw it upwards into the new headlight.

Here is a shot of the back of the headlight unit. There's this cool black rubber boot which sits over the bulb. As you can see, the halogen bulb still has the same three prongs sticking off the back. So we can just plug the original wiring onto the halogen bulb and go!
Be careful when installing the bulb not to touch the glass! Oils from your skin on the glass of the halogen bulb will cause it to melt down or even start a fire. Installation is pretty self-explanatory... underneath the rubber boot is a tan plastic ring which twist-locks in place. Twist it counter-clockwise, pull it off, insert bulb, put the ring back on, twist it clockwise, and the bulb is now locked into the unit. Stick the rubber boot back in place and it will look like my picture above.

One thing which is important, of course, is to make sure you plug the correct wires onto the correct terminals of the bulb. I have drawn on the plastic "socket" which the wires fit into before being plugged onto the bulb, "H" for high beam and "L" for low beam:
High beam (green wire) goes on the right prong, Low beam (brown wire) goes on the top. Ground on the left
And that's all there is to it! Plug it in and watch her shine:


Saturday, May 5, 2012

Update on DR70 upgrade

Well, a few things have transpired which I can report on.
1) First off: after finishing my first tank of gas, I averaged about 49mpg. I am very happy with this, actually, because it is better than I had been getting with just the SP3 pipe on the stock engine.

2) The 74 main jet is too lean for the kit plus the SP3 pipe. Although my mixture was quite good through the midrange, I discovered that going to a larger main jet was what made the full throttle bog go away. So, if you have a Sito+ or SP3 pipe, and it is derestricted, use something bigger than a 74 main. The next sizes I had were an 82 and 84, so I couldn't try any intermediate jets. The power felt a wee bit "soft" with the 82 and 84 so I think an 80 might serve better. But really, I'd start at an 84 on a given bike and work backwards carefully.

3) top speed: with the 82 and 84 main my top speed was about 47-48mph indicated. This was reliably reached on a flat, and I'm pretty happy with this, particularly since my primary goal was improved power during riding and not top speed per se.

4) I soft-seized. I am VERY disappointed about this - "broke" my brand new top end. I do not believe the soft-seize was due to mixture being too lean - the plug color was very good and I was running the 82 main jet at the time. Also, I was doing this after a 100 mile break-in period (as opposed to the 200+ mile period suggested by the manufacturer. Possibly bad chamfering, high heat, and an insufficient break-in period.
Let my tale be a warning.

Next step is to find someone with a ball hone, and get my hands on some fresh rings I guess.

*Edit* I am convinced the soft-seize was because I did not have enough oilllll. Trickiest part here is adjusting the autolube correctly. No more issues after cranking the auto-oiler up a bit more.

Thursday, April 19, 2012

DR Evolution 70cc upgrade for ET2

Here is a brief introduction to "Vespa" - my 2003 ET2. It's a 50cc 2-stroke CVT scooter I have owned since 2005. I conducted a series of upgrades on the scooter recently (See my Leo Vince SP3 exhaust upgrade thread on Modern Vespa and my struggles to get a 17.5mm Dell'orto PHVA carburetor working).

The SP3 upgrade increased the acceleration of the scooter a fair bit, and the top speed from ~37mph to ~42mph. This was after upjetting the stock 12mm Weber carb from a 76 to and 80 main jet, and lightening the rollers to 5.7 gram (included with the exhaust).

Adding the 17.5mm PHVA carb didn't really help the scooter. Overall, my conclusion has been that the 17.5mm carb is unnecessary on the 50cc stock engine, even after a modest exhaust upgrade. The engine doesn't breathe enough, in my opinion, to keep up with the more open throttle positions on the 17.5mm carb.

Following these experiences, and having become used to the power of my 200cc P200E Vespa, I decided to upgrade my ET2 from a 50cc cylinder to a 70cc. I mulled over kits for a while, but ultimately settled on the DR Evolution kit. It is a cast iron cylinder with 2 ring piston. I chose it over the Malossi and Polini cast iron options because it was cheaper, but has a reputation for being very durable. It also is tuned for more modest rpm levels according the SIP scootershop from where it was ordered - importantly, it's optimum RPM (~9000) is roughly that of the SP3 exhaust I have, so my thinking was that their intended power-bands were well matched.

Here is a shot of the DR Evolution 70cc kit (arrived incredibly fast from SIP in Germany!):

The instructions are charmingly sparse and poorly translated from the Italian manufacturer, but I read extensively online prior to the modification, and felt pretty comfortable in installing the cylinder.

The first step was to chamfer the ports in the cylinder. This means rounding the edges of the ports to reduce the likelihood of catching a ring in higher stress situations and trashing your top-end. The edges of the ports typically come from the factory VERY sharp and abrupt, and if you run your finger along them you can imagine how an expanding ring passing over the port could snag.

Here is an image of the ports before chamfering. The goal is to take a file or dremel bit and GENTLY soften the edges. People often recommend ~45 degree angle cut into the edge, no more than 1mm along the length of the bore, to create a ramp which will help the rings ride back up beyond the port without catching:

Here is an image of the ports following my dremel work:
Hopefully you can see the softer edges on the ports. I discovered, however, that getting the edges just right is very difficult, and I would not say I achieved a perfect 45 degree angle on each edge of the ports. I think the most important part is to be as consistent as possible, and avoid highs and lows within the same opening which might facilitate snagging of a ring. I recommend the slowest speed on the dremel and be careful not to nick the inside of the cylinder! Note that the edges of the ports parallel to the front and back of the cylinder are the most important, since the rings come against these edges, while they travel along the edges of the ports which run from front to back (perpendicular to the rings). Remember, the key thing here is you are NOT trying to open the ports up - you don't want to take of a ton of metal and change the port timing! All you are trying to do is soften the edges to help the rings cross the openings without incident.

The next step was to gently clear out grinding dust from the bore, then remove the pipe and old cylinder from the scooter.

Prior to installing the new kit, I prepped the piston by inserting the circlip on the left side. This is because there is very little space to work on the left side of the scooter with the engine installed (yes, I did this project without dropping the engine!). So by installing the circlip on the left side first, all I had to do was insert the piston pin through the right side and attach the right hand circlip (which is easily enough done on the right side of the scooter).

Here is the piston prepped for installation - note the green arrow indicating the circlip installed on the left side of the piston in advance (the bottom/exhaust side of the piston is marked with an etched arrow on the crown). Also note that the openings of the circlips should be toward the front or back of the piston, not up or down.

Finally, after installing the piston I lightly oiled the bore of the cylinder with 2-stroke oil, installed the base gasket for the cylinder-casing interface (also oiled), and gently worked the new cylinder into place! It was fairly easy to compress the rings and slip the cylinder on - much easier than on the P200. After installing the oiled head gasket, followed by the cylinder head, and reinstalling the exhaust pipe, the upgrade was complete!

I began with the following jetting in the 17.5mm PHVA carb for the DR70 cylinder with SP3 exhaust: 74 main jet, needle clip at 2nd notch from top, and a 34 pilot jet. So far, this jetting seems to be working beautifully - at break-in speeds (under ~42mph) the spark plug has a very good color and the scooter is responsive.

My first impressions are very favorable. This machine is FAST. I suspect it will hit 50mph on a flat pretty easily - while the top speed of the stock machine was ~37mph, it now hits 37mph almost effortless and will happily accelerate past this speed on a moderate incline. I don't know the top speed yet because I plan on gently breaking the cylinder in for about 100 miles first, but if nothing else I am very pleased with the drastic increase in low-speed power over the stock machine. It will be much better for my frequent two-up riding.

I will post back with updates on top speed and fuel economy (likely in the low 40mpg range), as well as refined jetting (if any) in the future. But for now, I will say that the DR Evo appears to be a great kit.

Friday, July 22, 2011

Motorscooter Diaries part 1 - Boston to VT and back

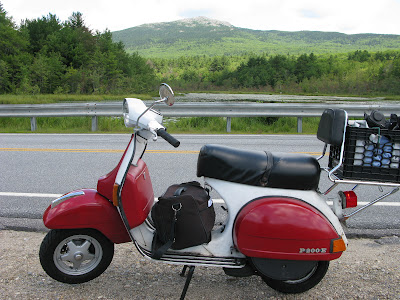
To take advantage of the celebrated reliability of the Vespa P-series, I embarked on a 500 mile trip, riding my 1980 P200E from Boston, MA, to northern VT and back. I spent most of my childhood growing up in central Vermont, and I am very sentimental about the country there. While in Vermont I visited scenic landmarks and friends and family near the towns of Randolph, Northfield, and the capital - Montpelier.

*note, most of the images are pretty clear and can be enlarged by clicking on them

 
View Larger Map

The trip took 6 hours each way (about 200 miles one way). Because the top speed of Old Rusty is limited to the lower 60s on a flat, I took all secondary roads and minor highways. I made about 4 stops each way to rest my hands, eat and hydrate, and refuel.

This is the longest ride I have gone on, but with a spare tire under the left cowl, a Jerrycan of spare gas, spare cables, and lots of tools, I was prepared for almost any eventuality.

I left Boston at 10am on Friday the 15th. It was a beautiful day - sunny with scattered clouds and about 84 degrees. The temperature was rather warm when stopped, but with a ventilated riding jacket I was quite comfortable once traveling above about 30mph.

The scooter all fueled up in Boston and ready to go
The route took me west out of the city through central Massachusetts.


Here is a shot of the scooter by a pretty pine forest in central Mass


Near the city, nobody paid me much mind (more than usual, anyway, on a colorful old machine like this). But once I was an hour outside the city I started getting noticed - waves from pedestrians in small towns, people in old cars honking, and plenty of waves from motorcyclists. This became particularly common once in southern New Hampshire, where Harleys were a common sight and I, meanwhile, was clearly riding from a long distance off.

When I plotted my route, I foolishly ignored topography, and was unaware that the path I was riding would lead up through the foothills of Mount Monadnock. The scooter rode the higher elevations pretty well, even without adjusting the carburettor, but there was a long stretch of road near the mountain with a posted speed limit of 50 coupled with a very steep incline. There were a few cars behind me which were unhappy. Despite slowing a few cars down, the route past Monadnock was one of the prettiest stretches of the journey, with scenic vistas of mountain farms and alpine lakes.

Here's a gorgeous shot of an old barn with the mountain peak looming in the background

And two pretty shots of the scooter crossing a high elevation lake - one with the foreground under clouds and the peak illuminated, and one with the peak under clouds and the foreground illuminated


On the other side of the mountain's foothills, I took a lunch break in the small town of Marlborough, NH. I ate at a small local gas station - cash only, regular gas only, cheese burger and fries made in front of me for $3...

Mt Monadnock behind me, the rest of the ride through NH felt long - especially once I was riding alongside the Connecticut river and could see the green hills of Vermont on the other side. But eventually I made my crossing near Springfield VT, and I was back in my childhood home state


From here, I rode one of the longest break-free stretches of the journey, but it felt a relief because I was back in VT. By this time, it was near 3pm and the sun was hot and my back quite sore. But Route 5 along the Connecticut river has a gorgeous mixture of curvy forested roads and open views of farm land - tall midsummer crops waving in the breeze along the Connecticut river with green mountains for a backdrop.

Eventually, my path branched off onto Route 12, a forested and shady road which cuts through low mountains up into the Woodstock/Quechee region. While my planned path was to cut northwest through Woodstock up through the mountains and farmland into central Vermont, I had to make a quick detour through the town of Quechee to ride across the gorge. Quechee gorge is a scenic point where the Ottauquechee River cuts deep into the hills. The town is full of tourists on a warm summer day, but the view is beautiful


The ride from Quechee northwest up through Woodstock, Barnard, and Bethel into the town of Randolph where I made my first visit to friends was very pleasant. The air was cool, and I was traveling roads I often took in my childhood. One of the wonderful things about driving through Vermont is that the scenery is constantly changing, from wild fields cut through by meandering rivers, to sugar maple forests, to farm land with cows lazily swatting flies with their tails, to pine-forested mountain roads, to the historic New England towns VT is famous for.

At last, at 4pm, 6 hours since my departure from Boston, I rolled into the town of Randolph where I went to highschool. I stopped by an old friend's house while in town to see her new baby (she was up in town visiting her parents from North Carolina).

I then continued on along Route 12 to Northfield, where I stayed overnight with one of my best friends and his wife. And my long ride was done.

In the following days, I rode the scooter back and forth between the homes of my friends in Northfield and Randolph, and my father in the capital of Montpelier. There were a number of fun adventures I went on for which I don't have photographs, including a scenic bicycle ride with my father along the Winooski river near Stowe, Vermont.

Below are a series of photos from my time on the scooter riding around the state.


While riding from Northfield to Montpelier to visit my father, my odometer turned over to 9,999.9. I figured I had better take a picture, because I wouldn't see that series of numbers again for another 90,000 miles...


The Vermont statehouse is quite a nice building. It's an interesting state, because Montpelier is so small that the governing politicians of Vermont are readily accessible - you can say hello to the governor in the bagel shop in the morning or a senator in the coffee shop just down the road


Here are some shots of Old Rusty stopped at Baker Pond, heading south from my friend's place in Northfield to Randolph. My elementary school class used to go hiking in the state park nearby


I tried to visit the parents of another of my childhood friends near Randolph, but they were not home. Nevertheless, their house has a commanding view of the valley, and I thought it was worth snapping a picture. My home used to be on the other side of the mountains visible across the valley


While I rode almost entirely on paved roads on my journey, most of the roads in Vermont are still dirt roads. To get to houses like that of my friend's parents above, I had to ride some of these paths. While less safe on two wheels, something feels more personal about old country roads like these, and the hazards of riding on gravel aside, the leisurely pace was a good fit for my slow old scooter

A Vermont country road


My last night in Vermont ended with a bonfire down at my friend's pond with a reunion of several old friends. It was nice for the Vespa to be able to attend


And finally, nearly halfway home to Boston, here is a picture of the scooter taken on the Vermont shore of the Connecticut river as I hid from the 90 degree heat


All told, I rode 500 miles on the trip, averaging about 65 miles per gallon (two fill-ups broke 70!). It was a long ride, with the return trip being particularly taxing due to high heat, a strong headwind, and severe traffic outside the city. But the scooter performed without a hitch, and didn't seize up even after long stretches of riding full-throttle. I'm confident that I could cross the continent on this machine as some have done in the past, but it is clear from the riding position and power output of the vehicle that it is not meant to be comfortable for overly long distance rides except at moderate speeds and with frequent breaks. While vintage scooterists consider this a model built for touring relative to other vintage Vespas, the riding position, wheel size, and engine displacement are all still of a design optimized for nimble urban riding.

Still, the scooter handled the task with relative ease, and I believe the route I followed would be absolutely amazing with fall foliage and cooler weather. I may yet ride to Vermont again...

I will leave with an obligatory picture of my father's puppy, Henry, taken on this trip